
A month or 2 ago, the 3000gt started making a weird noise. At first we couldn’t figure out what it was, but then I opened the timing belt cover and found there was no tension. Amazingly, the engine didn’t grenade, only jumping a tooth or 2. (lucky) Life got a little busy for a while, but when I got back to it, the problem wasn’t all that hard to fix. That’s not to say I didn’t run into any issues though. I learned a few things along the way as well, so I thought I’d document them here for anyone who finds themselves in a similar situation.
First, get yourself a copy of the service manual. The illustrations and step-by-step instructions will be helpful. Second, get a pair of cam sprocket locking tools for the 6g72 engine found in the 3000gt/Stealth/GTO. You’ll need these to immobilize the cams while working on the rest of the system. Third, make sure you have a supply of binder clips on hand. These are specifically called out in the manual and are definitely necessary. (3/4in or larger will do) If your car hasn’t had this service before, go ahead and buy a complete kit with the belt, pulleys, and a replacement water pump, seals & gaskets. The space is pretty tight to work in and you’ll likely not want to do this more than once. (the water pump is a common failure and seals and gaskets will all need replacing)
If you’re doing this at home, you’re going to need a number of tools to be successful:
- engine hoist/crane (needed to support the engine and allow removal of the driver’s side engine mount)
- load leveler (needed to lift the engine evenly)
- heavy duty impact driver (needed to remove the crank bolt from the pulley)
- mitsubishi/hyundai cam belt tensioner socket (needed to set the pre-load on the tensioner. you may also be able to get away with using a set of long right-angle snap ring pliers, but this will be more difficult. **mitsubishi/hyundai tensioner pulleys require a tool with 14mm pin spacing. VW/Audi tools look the same, but have 18mm spacing, so confirm it’s the right tool before you buy)
The service manual does make some assumptions and isn’t 100% comprehensive, so there’s a few things you can do to be prepared for that. First, rotate the engine until the timing marks on the cams are aligned. This should put piston 1 in the TDC or Top Dead Center position. Tip: If your belt was loose like mine was and 1 or more of the sprockets has jumped a few teeth on the belt, try to get as many of the other marks on the sprockets aligned with the marks on the head and block as possible. Then secure the belt to the sprockets that are aligned. (with binder clips) Use a box-end wrench to rotate the sprocket that’s out of position with one hand while you make slack on the belt with the other. When you have it in position, secure the belt to the now properly positioned sprocket with a binder clip. Putting the engine at TDC first will make everything easier when you replace the belt and pulleys.
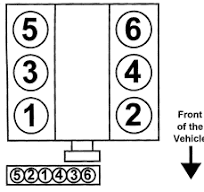
The cylinders in the 6g72 v6 engine are laid out with odd cylinders on the left and even on the right when facing the engine from driver’s side. (image is for a different orientation than the transverse mount in the 3000gt)
Second, before setting the pre-load on the new tensioner pulley, release the crank sprocket by adding slack to the timing belt around it and rotate the crank sprocket 2 teeth left of the timing mark. Pull the belt tight to the bottom of the crank sprocket leaving the slack above the sprocket. When you tension the belt, the pulley will pull enough slack out of the belt that it will rotate the crank sprocket clockwise. Doing this step in advance makes sure that when the slack is taken up, the crank sprocket will be in perfect alignment with the timing mark on the block. (if this works out differently for you, count how many teeth it’s off and adjust as necessary after loosening the tensioner and try again) Tip: don’t release the pin from the auto-tensioner until the tensioner pulley pre-load has been set and you’ve confirmed that all timing marks are aligned.
This job is definitely doable in a few hours if you’re well prepared. I’d also recommend having a helper if possible, but it’s not 100% necessary. The main difficulty is how tight the working space is and how crowded with parts it is. I had to redo the job twice as I learned a few things, so hopefully this helps someone else avoid all of that.